Monday, December 27, 2010

mini craftaganza

From time to time, members of the former knitting circle (when the triangle had more members) would get together at someone's house for a day of crafting (and wine and food, of course). We'd try to pick projects that could be completed during that one day. So a few weeks ago, S and I decided that instead of a normal knitting evening, we'd make Christmas stockings. S opted for Denise Schmidt's quilted stocking and I went for a felted sweater stocking, using the pattern from the book Warm Fuzzies. I like working with felted sweaters, although my husband hates having all the old sweaters and sweater pieces around the house. I need a craft storage plan, but that's another story entirely. But I have made a few baby blankets with felted sweaters in the past--the sweaters are easy to work with and projects go pretty quickly. I saw some really cool puppets made out of felted sweaters at Abodeon in Cambridge the other day and they definitely sparked my curiosity--I think I might have to try a puppet or two!

We each made one stocking that night, and I made a couple more before Christmas for the boy and the baby. Because we don't have a fireplace, here they are hanging on the stairway with care:

Sunday, December 26, 2010

baby booties

After starting over more times than I care to admit, I finally finished e's baby booties. As always, the first one went really smoothly and the second one was AWFUL. This is exactly why I have never been able to complete a pair of socks...

The pattern is called Bitty Booties and I bought it on Ravelry.com. They weren't necessarily difficult to knit, but I think they just got confusing when I left them for too long and then came back to them and would then have no idea where I had left off.

The pattern for the hat is from the blog Lost the Thread. I used Malabrigo yarn, which I love. The hat doesn't fit the little one yet, but hopefully it will soon!

Saturday, November 20, 2010

a bassinet of sorts

When I was a baby, I slept in a basket hung from the ceiling. For the past 30+ years, my parents kept the basket and have now given it to me to use with our baby-to-be. When I slept in the basket, it looks like my parents just put me in there with some blankets and called it a day. Of course, I need to make things at least 85 times more complicated.

My dad made an amazing rocking stand for the basket and then I cut a bassinet mattress to fit the basket, and started to make the bedding. I found a tutorial that was somewhat helpful, but I had a lot of trouble making the fitted sheet. I'm sure it doesn't help that I am not great at sewing and I'm even worse at measuring. Finding instructions for making an envelope-style pillow cover and many emails between the knitting triangle gave me the breakthrough I needed (including one that gently reminded me that I needed to make more than one sheet...apparently babies can be messy).

Even with a few frustrating moments and a bunch of trips to the fabric store, I'm happy with the way it came out!

Thursday, October 14, 2010

Annual Pumpkin Beer Pub Crawl House Party Craft

Due to the distance that separates us, the Knitting Triangle could not come together to create a party favor for the 6th annual PBPCHP. However not finding the lack of handmade goodness to be acceptable, I decided to dive in myself and make a craft.

Let's get one thing out of the way: I have always wanted to have an excuse to etch glass.

Etched pint glasses seemed the obvious direction to move in. A trip to the Dollar Tree yielded twelve shapely pint glasses for $12. No complaints there. A trip to Joanns did not have such success. I was led down a bad path by a sales associate who tried to convince me that frosting spray paint is the same as etching cream (it isn't) and that plastic sheets would work fine on the rounded surface of a glass (it didn't).

Two botched glasses later I was back to the Dollar Tree and then hit up Michaels, the craft store of the gods, where I was rewarded with the proper supplies, although they cost a pretty penny - etching cream ($12), flexible plastic stencil sheet ($7).

I designed my own stencil and cut it out of the sheet - easy. Very forgiving material to work with. And it stuck to the glasses like magic - goes to show that having the appropriate supplies can make or break a craft. Dabbed on the cream, waited 5 minutes (LITERALLY) and it was done. And all of my party guests took home a beautiful hand made glass that they can use to consume Pumpkin Beer until the next party.

Tuesday, October 12, 2010

Handmade Wooden Blocks

Kids love blocks.

From the time they are very small, babies love the feel of wooden blocks in their hands (and mouths!), to stack, knock over, push around, etc. Imaginative kids will use blocks as food, as game pieces, as buildings, as virtually anything their little minds can create! That's why I think wooden blocks are one of the absolute best gifts for young children. And handmade wooden blocks? Even better.

I set out to spend $0 on this project. Sure I love my nephew but gift giving is expensive (and of course I bought him clothes, stuffed animals, books, etc etc it never ends!) So I wanted something that was both cheap and handmade.


I started with scrap wood from my dad's workshop, and had him cut it into perfectly square blocks. Then I sanded the blocks which probably took the bulk of my time. But it's really important that they are nice and smooth for little hands. A couple of coats of acrylic paint were thrown on top, and I hand painted the letters of the alphabet. This wasn't a project I did alone either - my boyfriend and I enjoyed working on it together in the evenings.

Finally we coated the blocks with Non-toxic shellac. This was really important considering my nephew is only one and these blocks will spend most of their time in his mouth. In the future I would have made a bag to store them, but I simply ran out of time.

Total actual cost: $5 for the shellac. Not too bad for a toy that should last years to come!

Wednesday, September 29, 2010

Cynthia Treen's baby quilt

One of my best friends from high school just adopted a beautiful baby boy from Taiwan. After the months long process (with two trips to Taiwan), they brought him home to Boston at the end of September. It must be so amazing--you go somewhere and get to meet your child and spend some time with him/her, and then you have to leave and come home and wait while lawyers, etc work out all of the details and just wait for the call. And then that second trip must be even more incredible--you leave home as two and return as three! That flight home must be just amazing.

We're going to her baby shower this weekend, and I just finished making a baby quilt for them from Cynthia Treen's Last Minute Fabric Gifts. One of my other favorite sewing projects (cotton knit animals) also came from this book.
I really like the book--it's organized in sections--less than one hour gifts, one-to-two hour gifts, two-to-three hour gifts, and more than three hour gifts. There are also a lot of sewing hints and tips in the front and back of the book that would probably be very helpful if I would take the time to read them!

For the quilt, I tried to pick colors that would be good for a baby, but also wouldn't seem too babyish. I wandered the crowded aisles of Sewfisticated until I found fabrics that seemed like they would work well together. Here's the quilt:

Tuesday, July 27, 2010

Playmates for a Playdate

While trolling my usual blogs I stumbled upon a great rag doll pattern from Patty Young's new line of fabric, Playdate. Three of these adorable rag dolls come on a panel of fabric, and were quickly delivered right to my doorstep. I remember this style of fabric paneling from my youth, when my admittedly uncreative mom would cut Halloween costumes from panels purchased at Joanns.


The girls were easy as pie to cut - in fact I was able to do it while playing with the kids, which is no small feat. The kids were really excited to be involved too, taking each piece that I cut and matching the fronts and backs together. They stitched up in no time, and the stuffing was made easy by using a chopstick (I'm sure there's some tool for this, but the chopstick worked just fine!).

The next morning the kids came down to three new dolls who quickly earned a special spot in the "stuffed animal" army and were seen running around the house, having a spot of t, and riding dumptrucks.

Now I just think they need some cute clothes, don't you think?

Monday, July 26, 2010

love in circles

I haven't had much to post about lately because I've been working exclusively on one project: a wedding quilt. This is the first time I've tried to make a quilt for a wedding, and with good reason. It's been an incredible amount of work. However I also deliberately chose a pattern that would stretch my skills. I've learned so much, and next time I think it will be a bit easier.

All that being said, the wedding's in a week and the quilt still isn't done. The top is patched together, now I just need to get to the quilting. Maybe sometime this week, or maybe it will be ready by September, just in time for the cooler weather.

The quilt is Denise Schmidt's (who I have ALWAYS loved) Single Girl quilt - a new take on the traditional Wedding quilt. I love that the rings touch but do not intersect each other. I chose the colors based on items on their registry. The quilt involved cutting and then sewing 36 x 16 + 8 x 16 which, if you're not good at math is 704 pieces. Crazy. But fun.

Monday, June 7, 2010

Knitting in Pairs

After years of exploring different knitting projects: baby blankets, hats, scarves, even sweaters, I've come to the conclusion that the only thing I truly love knitting is socks. But each time I undertake this venture, I find myself regretting it once I get to the heel of the second pair, and I exclaim "DON'T EVER LET ME KNIT A PAIR OF SOCKS AGAIN".

Knitting socks, for those of you who have never tried it, follows a typical pattern, and the pattern is this:


"cuff - leg - heel - foot - toe"


or translated (and here I quote Stephanie) as:

"interesting - boring - interesting - boring - interesting"

It never fails that by the second sock, when I reach the first segment of "boring" I am just that, completely bored. And even if the yarn is some kind of super expensive super exciting self-striping magical adventure, by this point I'm over it. I'm ready for something new. I'm ready to not be knitting socks anymore.

And from this frustration, the greatest idea of all time was born: why not knit socks in pairs?
I don't mean pairs like one sock, two sock.
I mean pairs like two people.
Each knitting one sock. Cutting the "interesting-boring" cycle in half, and therefore the completion time.

Now for some of you (Emma) who pride themselves on precision, this may not be for you. But for those of us who don't mind a pair of slightly-different length and gauge socks, I highly suggest trying it!

You'll need two balls of matching sock yarn (the downside, as most of the time you can create a pair from one skein) and a willing partner. After some disgruntled text messaging arguing over needle size, you can get started! In a few short weeks, an unsuspecting friend can be the recipient of a cool pair of new socks. And you, my friend? You can move on to your next project...

Thursday, April 8, 2010

Craft independent

I have a few great yarn stores in my area that I very rarely visit. But a few months ago, that all changed. It dawned on me that I should be supporting my local indie craft stores so I have sworn off getting any knitting supplies from those giant chain stores (ok, I still go to Joann Fabrics everyday on my lunch break but it's a start). I discovered this great website Knitmap a year or two again. I use it from time to time, generally to find yarn stores in places I'm going to travel to (and then never visit, like the extensive research I did on yarn stores in Boulder and then visited none of them).

So really what I'm trying to say here is to try to go to these little yarn stores because you never know what you may find. I visited my local yarn store a few weeks ago only to find a buy one, get one free sale. And this goes for more than just yarn stores, websites to help you find independent craft stores are popping over all over the place (like here). Em also wrote a great post awhile back about shopping locally too.

I've also sworn off Dunkin Donuts but that's another post for another time...

Wednesday, March 31, 2010

Sewing Necklaces

Tomorrow is my birthday, and since I am having a serious wardrobe issue (or lack of wardrobe issue?) I felt the need to make myself a new accessory to compliment the rather bland ensemble I have laid out for the special day. Being that I am also poor (the reason for my wardrobe issues) I had to use supplies that I already owned. Luckily this never seems to be much of a problem.

I dug up an old fat quarter from Sandi Henderson's Farmer's Market Collection. I found some wooden balls rolling around in the bottom of one of my art room drawers, and recalled a free pattern Amy Butler had put out a few years back for a fabric necklace. And voila, a necklace was born in about an hour.

It really was that simple. Being that I never like to follow directions, I barely referenced the pattern and just plowed ahead using what I had. The wooden balls were 3/4", so I cut my bias strips at 3" and called it a day. I added balls and knots until it felt right. I debated a double width necklace but it seemed more suggestive of Mardi Gras than stylish crafster, so I went with a long single strand. I whip stitched the ends together (I could have tied a bow, but I'm not into bows) and there you have it.

Hump Day Eye Candy

I finished my 4th pair of socks today!

Yarn: Lion Brand Magic Socks

Needles: 3

Pattern: I used the pattern on the yarn wrapper for the 1st time in my knitting career. It worked out great and will now be my go-to pattern for all socks.

Tuesday, March 30, 2010

Peep Off

After showing my co-worker this we decided to have a craft challenge based on making a craft out of Peeps. We headed straight to the store to pick up Peeps in every color. We also threw in a 12 pack of plastic eggs. The challenge was to make something out of those items with the craft supplies we had at home... we couldn't buy anything else.

I got home from work that day and immediately got to work. I had a few ideas for a Peep garland. The Peeps were super gooey and very hard (and messy) to get a needle through. Only then did I realize (Emma realized actually) that it would be best to wait for the Peeps to get stale before trying to string them. So I put my craft challenge aside and have yet to pick it back up.... I can't say the same for my co-worker. She came in yesterday with this AWESOME wreath.

She used a foam wreath form, some hot glue and a few toothpicks. I love the colors and it's nice to see this every time I walk into our office. I better get to work with my challenge!!!

In other news... if you actually read our blog become a follower! I'm pretty sure having more than 6 readers would be great motivation for my fellow blogettes (and me).

Sunday, March 28, 2010

spring-themed baby shower

Between working on my evil, evil thesis and planning a baby shower for my friend k, I haven't had much time for crafting! Now that the shower is over and since I have already claimed cooking as my creative practice in an earlier post, I figured I'd report in on the crafts and food.

From the very beginning, I pictured a spring theme--with birds and tulips and greens, yellows and whites for colors. It ended up just as I had pictured it.

I had wanted to make stuffed birds as favors using this perfect (and super easy) pattern. In the end, a friend's very crafty mom came through and made ALL of the birds! They were beautiful...
My dad even made a cute display tree for them.

Whenever I have people over, I try to come up with a menu that can be prepped/made ahead of time so I can hang out with guests without having to be dealing with food. I also secretly am not very good at having help in the kitchen, so it's good for me if everything can be done before people arrive!

I went with a chilled pea & buttermilk soup, beef tenderloin with arugula salad, raspberry chicken with baby spinach salad, snap pea and avocado pasta, and a white bean salad (courtesy of pictures & pancakes). H's mom brought a couscous salad with chicken, dried cranberries, pine nuts, chickpeas and other yummy things. Everything was either cooked or cut up and prepped on Saturday, so it all just had to be put together on Sunday before the shower. Besides for making enough food to feed at least 4 times the number of guests we actually had, everything went smoothly! K's mom brought the fixings for delicious bellinis...I had no idea I even liked bellinis!
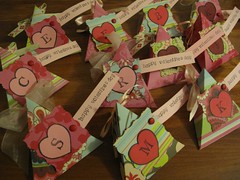
At the first meeting of the knitting line last week, Stephanie mentioned Baby Shower Bingo. As soon as she mentioned it, I knew I had to have it--I always think the present-opening part is so awkward, and this would give people something to do. I then spent more hours than I care to admit creating the cards...but it was all well worth it--people got very competitive and into it!
I had fun planning and hosting the shower and really enjoyed honoring the mom and baby-to-be!

Wednesday, March 24, 2010

You Crochet Me Right Round Baby Right Round

Since moving away from my beloved Knitting Triangle I have been very unproductive in the crafting arena. Perhaps it's all of the unpacking, adjusting, and learning that goes along with a new job, but I've been spending my nights horizontal on the futon watching tv. Watching tv is one of my most loathed activities (driving and cooking being two more) but I haven't had the energy to do anything else.

That is until I was inspired by an awesome crochet pattern Steph shared with me, along with a begging note to make her the featured earrings. Crocheted earrings? Sounds awful, but take a look before jumping to judgment:


The pattern called for worsted weight yarn, but of course my complete disdain for being told what to do led me to use bulky yarn. They were huge (that's what she said?) and so I made a second pair in worsted weight yarn. They still looked big so I moved onto something that perhaps was Fingerling weight (I say that as if I know what that means) and those were by far my favorite. Tonight I might try some sock yarn and see what I come up with - needless to say these take me about five minutes a pop because I am a master crocheter. If you have some yarn scraps send them my way and I'll whip you up a pair.

Tuesday, March 23, 2010

Yo yo ma


I was recently introduced to the addictive art of making yo yos. I promptly gathered all my scraps and recreated this. It's just the first of many necklaces and other projects I hope to create with my newly obtained skill. I am dreaming of all the uses for these little beauties...

In other news our knitting triangle has suffered a great hit... Kristen has left our glorious Bay State for the suburbs of Connecticut. I am hoping she will continue to contribute to the blog... and the remaining members (me and Em) will hold our first meeting of the knitting line tomorrow.

I also have two new knitting projects I hope to get up here soon...

Saturday, March 13, 2010

Easter Wreath


I am a chronic early decorator for the holidays. I took out my Easter decorations about two weeks ago. After decorating my apartment it still lacked spring cheer (especially after being covered in hearts) and the one big thing I was missing was a wreath. I contemplated making one out of blown out eggs but after a few disastrous tries last year I decided I needed to take another route.

After an extensive internet search I came upon a silk flower wreath. I've always hated fake flowers but I decided to channel my grandmother's love of decorating with artificial flowers and headed to my local craft to pick up my supplies. And I came upon one realization: fake flowers are really expensive. So I left empty handed. Fast forward to a few days later and a trip to the dollar store and I was well equipped to make the wreath

And I made it for a whopping $6. And it's pretty cool. How can you go wrong with 2 for $1 glitter egg and bunnies? All you need is a foam ring and fake flowers that are on wire stems. Cut the wire stems about 2" and just stick them in as you see fit.


Monday, February 22, 2010

Repurposing

I acquired a beautiful pair of clip-on earrings a few years ago. I have been holding on to them looking for the best way to showcase them. Last week I went to Sweet Beads in Lexington before meeting some friends for dinner (we ate at Nourish. Go. It's SO good). While perusing the samples looking for inspiration I saw what I've been waiting for... a beautiful necklace with a bold centerpiece - an old clip-on earring. A lightbulb went off and my head and I have been dying to make my own version of this necklace since.


I poured over the beads today at my local bead store looking for something that would go with these lovely clip-on earrings. I left with two strands of purple pearls and a few purple crystals. I ran straight to my art desk upon entering my apartment and instantly got to work. I kept laying out all these options but nothing seemed right. It then dawned on me to take apart the other earring and use those beads in the necklace. And then it just all came together.

To get the necklace started I removed the clip on the back and bent down the attachment. I strung the wire through the holes in the back and used a crimp bead to keep everything together.


I will definitely be scouring the tag sales this summer for more clip-on earrings!

Sunday, February 14, 2010

Heart Craft Day #14: Pancakes

Happy Valentine's Day!! This completes my 14 (well 13 because I skipped yesterday...) days of heart crafts.

This morning I made my Valentine heart shaped pancakes. I looked up some various ways to do this and came up with two: use a heart shaped cookie cutter, pour the batter in and once the pancake starts to cook a little you remove the cookie cutter. The other way is to put the batter in a ziploc bag, cut the tip and freehand draw hearts in the pan. I tried the cookie cutter method and wasn't crazy about it. The cookie cutters got very hot and since I'm impatient I removed the cookie cutter too soon and got a blob. I suggest the ziploc bag method. A lovely way to start off Valentine's Day!

Friday, February 12, 2010

Heart Craft Day #12: Papercraft Gift Boxes

Auntie Steph came by the other day with Valentines for the kids that she had purchased at a craft fair in Connecticut. The kids loved the chocolate inside but I was more interested in the construction of the cute gift boxes. So I deconstructed the pattern and began building some of my own. Let me tell you - it was addicting!

The pattern is a rectangle, with strategic folds and holes punched at the top. I cut out hearts and stamped the initials of my coworkers onto them, and stamped a little message wishing them a Happy Valentines Day. Some ribbon and red fasteners and voila, little valentine boxes to fill with chocolate!


What I love the most about these is the versatility of the pattern - I could imagine them as favors for anything from a baby shower to a wedding, depending on the fanciness of the supplies. Lucky for me I was able to construct these purely from things I already had around the house!

Thursday, February 11, 2010

Heart Craft Day #11: Freezer Paper Stencils

If you read this blog (which I'm not sure anyone does) or if you were on the Pumpkin Beer Pub Crawl '09 with us you've seen these t-shirts. Freezer paper stencils are one of the quickest and coolest ways to make a personalized t-shirt. Emma wrote up some great step by step how-to directions in this post.

I decided to make one for my man for Valentine's Day. And seriously... what's better than glitter fabric paint?


Wednesday, February 10, 2010

Heart Craft Day #10: Wrapping Paper


Now that you've made your special someone something heart shaped and homemade it's time to wrap it up. The gift I bought for my boyfriend will not be making it in time... so I figured I should wrap up the consolation gift in something pretty in hopes he forgets about my gift giving faux pas.

I had some white craft paper and these great new letter stamps (which luckily included a heart stamp) so I went to town. Just be sure to center your designs... I also glued some heart shapes made from cardstock on and a cute bow. The only snag was that the paper is a little see through. I just wrapped the gift in some red tissue and it solved the problem.


(I know technically this should be one of the last posts but all my other crafts are in the drying phase)

Tuesday, February 9, 2010

Heart Craft Day #9: Felt Coasters


These felt coasters are really simple:

Cut two pieces of 4" x 4" felt and one piece of 3 3/4" x 3 3/4" fabric. Fold one piece of felt in half and cut a heart shape on the folded edge. Layer the fabrics - uncut felt on the bottom, fabric with printed side up next, and the cut piece of felt on top. I embroidered a running stitch around the heart shape and a blanket stitch around the edges. But be creative! (Those are honestly the only two embroidery stitches I know) These can even be stitched on a machine if you are so inclined.

It looks like we'll be snowed in the for the latter part of the day tomorrow so I'm going to be attemping a craft we've featured on our blog but with, of course, a heart twist... and if it comes out as planned I'm going to wrap it up and give it to my special Valentine.


Monday, February 8, 2010

Heart Craft Day #8: Ribbon Belts


To find the length of your belt it's best to measure it around where it would sit on your jeans. Since most jeans sit lower on the waist these days, your belt is going to be bigger than your natural waist measurement. Just wrap the ribbon around and add about 7 - 8" to fold back and go through the d-rings.

I used 7/8" pink solid grosgrain ribbon with 5/8" wide heart printed grosgrain ribbon. I centered the printed ribbon over the solid ribbon and edgestitched both ends down. Giving the ribbon a good press with steam took out all the puckers (stitching ribbon makes it really puckered, ironing it always saves the day). The d-rings should be about 1/4" wider than the ribbon (I used 1 1/4" wide). Thread the ribbon through both d-rings and stitch down. Be sure to double bendback the ribbon so no raw edges are showing. Grosgrain ribbon frays like crazy. Double bendback the other end of the ribbon and stitch down.

You can get as creative (or uncreative) with this as you want. You can use a few layers of different sizes or just one ribbon... one thing I have learned is that it's always best to stitch the ribbon down. The heat adhesive tape or glue just doesn't look as nice and doesn't hold up as well.

Sunday, February 7, 2010

Heart Craft Day #7: Cookies


Two of the cutest 3 year olds in the world brought over these delicious heart shaped cookies today. Decorating treats for a loved one on Valentine's Day is probably the most popular DIY gift.

Making cookie cutter sugar cookies requires some serious dedication. There's rolling and cutting and baking and decorating involved. But the end result is so cute it's worth it. And there are so many cookie cutter shapes out there and a wide variety of sprinkles so it's easy to be creative.

As for the sugar cookie recipe my personal favorite is from the Better Homes and Gardens Cookbook (the one with the red plaid cover which is a MUST have in my mind). Anyone else have a favorite sugar cookie recipe?

Saturday, February 6, 2010

Heart Craft Day #6: Heart Pins

This is another easy craft that comes out super cute. After our emergency trip to the craft store we came home with a giant bag of wooden hearts and some tacky glue. I had some acrylic craft paint lying around in pink, red and white. We had a great time painting them (Kira and my mom participated in this craft). Once they dried we put varnish on them to protect them. Once that dried, we glued them together (or just use one) and glued a pinback on. These will make great gifts for a co-worker or family member for Valentine's Day.

Friday, February 5, 2010

Heart Craft Day 5: Inspiration

Ok everyone... I'm flaking on day 5. I participated in the Fashion Senior Review at Lasell College, then drove to CT, and am currently celebrating my Dad's big 6-0.

So I am leaving you today with some inspiration. My mom bought this great (and incredibly unique) yo yo wall hanging from a craft fair. And yes, my mother shares my great love of hearts. I'm pretty sure it's hereditary actually.


I will be taking an emergency trip to the craft store tomorrow and will be back with plenty of projects... I have some good ideas!

Thursday, February 4, 2010

Heart Craft Day #4: Beaded Ornaments


I'd like to start off by telling everyone that I experienced my first heart related craft injury on this project. I had my wire curling tool thing on my couch and was moving around excitedly about these ornaments and the edge jabbed into my foot. All for the sake of crafting!

This is another great project to use up some odds and ends lying around the house. Pipe cleaners, wire, leftover beads from a project gone wrong... String them on, bend into heart shape, secure at the point of the heart and attach some lovely trim to hang. I made one with a leftover pipe cleaner and pony beads and another with 20g wire and some sparkly fake crystal beads I had taking up space in my craft nook.

Wednesday, February 3, 2010

Heart Craft Day 3: PomPom Garland


I always thought this pattern was too cute for words. So I set out to make it last night and it dawned on me that maybe I could just use the heart shapes for something instead of sewing them up and stuffing them. I strung them together using a darning needle and a long piece of yarn. And added some pompoms for good measure. This is a great stash buster idea... I know I have an endless supply of pink and red yarn.

Tuesday, February 2, 2010

Heart Craft Day 2: Heart Garland

When this popped up on my Google Reader I knew I had to make it. I am lucky enough to have a friend who subscribes to every magazine under the sun and passes the along to me. So I grabbed a stack of old magazine and got to work. I didn't realize how many hearts I punched until I stitched this together. It came out to be about 10 feet long and is now hanging all around my kitchen. I may never take it down!

Monday, February 1, 2010

Heart Craft Day 1: Paper Clip Earrings

Paper clip earrings are a quick and easy way to make a unique piece of jewelry. My local Michaels had a few different sets of paper clips in the dollar section. And since they had heart shapes I of course bought them.

All you need are earring wires and some needle nose pliers and you can make them. Simple and cheap. And very cute.


I heart hearts

I wonder if I can come up with a different heart craft for the next 14 days. Hmm...

Monday, January 18, 2010

More baby crafts?


It seems either we have gotten to the age where the only thing to do is have babies or there just happens to be a baby surge right now. I promise we'll have some adult related crafts to post about soon!


I went to a baby shower yesterday for an ex-coworker. I know her well enough to know she's very specific and meticulous so I didn't want to make anything to ornate or something that wouldn't match her nursery. Also she's not finding out the gender of the baby so I had to find something gender nuetral as well. I bought a few things off her registry but wanted to add a few personal touches.

So I choose to make this baby hat:

Also some very crafty women that I work for make and sell their crafts. They just started to add burp clothes and bibs to their inventory so I added those into the gift basket. Everything was a success. Except for the fact that me and a 75 year old woman were the only ones who handmade something. I wonder if that makes me on the cutting edge or really old fashioned...