A basketful of valentines arrived home yesterday.
There were the usual suspects: Buzz & Woody, Dora, Lightning McQueen, Disney Princesses
The usual trinkets: pencils, playdoh, and lots and lots of tooth decaying lollipops
And some standouts: NASCAR, a card printed from tinyprints.com with a picture of the child
But amongst 17 Valentines, there stood only one lonely handmade one.
And now, my quest for a new friendship begins. :)

Wednesday, February 16, 2011
Monday, February 14, 2011
Nothing Says I Love You Like Handmade

Let's get one thing straight: I do not love love. Nor do I love Valentines Day, a materialistic sickeningly sweet concoction invented by Hallmark to chase away the winter doldrums. However since having kids I have tried to feign excitement and of course if crafting is involved, I'm glad to participate.
Last weekend I made Valentines with the kids to bring to school. I did a little prep before hand by cutting out appropriately sized cardstock and stamping the names of each kid on the envelope. Then the kids used a new heart shaped punch which they enjoyed immensely, and I had them hand write their own names on the cards. Glitter and stickers were copiously applied. All in all it wasn't too bad pulling together 34 total valentines between two four year olds.

Last week we placed the cards along with homemade sugar cookies in each kids' basket at school. Tomorrow we get to pick up our baskets and see what we got. I have already decided that I will leaf through the Valentines and if any are handmade I will make it my priority to befriend that kids' mother(s). What do you think the chances are that any of those valentines will be anything other than an overpriced store-bought character plastered piece of garbage that the mother wrote the names on??? Come back tomorrow to find out!
Friday, February 11, 2011
Crafts With Kids: Contact Paper
In my crafting cabinet, one of my absolute favorite supplies that I return to is the roll of contact paper. A gift from a nanny several years back, this one role has taken two kids through several seasons of nature walk collections and stained glass artwork. Kids of virtually any age will enjoy placing things on the sticky paper. And as they get older the projects can evolve, like this one where we shared in the responsibility of cutting out shapes and then arranging them on the taped up contact paper, using our dining room windows as our easel.


Thursday, February 10, 2011
The Best Gifts In Life Are Free
When people think about crafting gifts, they often assume it will be cheaper than actually buying something. This is typically not the case, at least for myself. When I come up with an idea, it always seems simple enough. But then after three trips to three different stores, I usually end up with a handful of expensive supplies and tools that I didn't realize I needed. And then factor in the time. If I actually "paid myself" for the time spent crafting, I'd be rich. (Of course, I wouldn't be able to afford myself).
In these days of tight budgets it's always wonderful to stumble upon a cheap handmade gift idea. To find one that is free, simple, and quick is like hitting the lotto. And for it to end up as something that people actually enjoy? Well, that right there is gift giving ectasy.
I've found the perfect free quick and easy gift. Fabric wrapped hangers. If you haven't received them yet, rest assured, you will by next Christmas!!
I was inspired by this tutorial at Corrieberry Pie. She created the hangers as a method of displaying the jewelery she is selling on Etsy (currently her shop is closed).
Simply put, you cut strips of scrap fabric (and don't be fussy, it's not going to matter if they are uniform!) Find some old plastic hangers, and using dabs of hot glue, wrap the strips around the hangers. Voila. It couldn't be easier. And they were a big hit with the ladies, I assure you!

Wednesday, February 9, 2011
I laughed. I cried. I screamed. And then I sewed some binding.
The Single Girl Quilt. Remember it?

Well I finished. Months after the wedding, even months after the newlyweds flew back from their honeymood and hosted their first major holiday together. I finished it.
This quilt presented a few unique challenges. Of course there were the massive quantities of tiny shapes I had to first cut, and then sew together. I didn't find that part overly challenging, nor did I fuss too much about perfection (that's just not me, and to me, perfection just is not handmade). The real trial came when I had to quilt a queen sized quilt. I just had not anticipated the challenge I would encounter trying to lay such a large piece of quilted fabric flat on top of batting and backing. And then quilting it. Don't get me started. Shoving that giant roll into my tiny machine was not working. Even a larger, borrowed machine barely did the trick.
But in the end I was proud of pulling it together. This is by far the most ambitious quilting project I have ever taken on. I cried a few tears the day I had to give it away. But maybe someday, someday far from now, I will venture to make one again. But next time, I'm keeping it.

Tuesday, February 8, 2011
How to Build a Birthday Party
There are few things I enjoy more than throwing my twins a birthday party. Picking a theme, handmaking decorations, and having family over to celebrate another passing year has grown to be one of the best coping mechanisms to get through these long New England winters.
Every party starts with a theme. This year was the first time the kids chose for themselves: The Lorax. Perfectly non-conventional for me! I used a board on Pinterest (have you used it? omg it's my most favorite internet invention ever! go there!) to compile inspiration shots from around the web. I was amazed by what I accomplished with a limited budget. Using supplies I already had combined with a few purchases from the dollar store we were able to create a fantastical day!

 Paper streamers. I was inspired by Erin's Lemon & Lime Shower and will now make these for every event I host! So simple, cut 1 inch strips of 12x12 scrapbook paper, sew together in seconds! Tissue "Truffula Trees" tutorial by the great Martha Stewart.

I handcrafted a dozen unique headbands. Headbands are a staple at our birthday parties. These had butterflies, birds, and feathers. They were probably my favorite part in creation and execution!


Hand-drawn Lorax overlooking the gifts. Heard a tip that the Dollar Tree sells $1 foam board. Good deal!

And finally the favors - packets of "Truffula Seeds" with the kids picture. You know how I feel about weddings, but there are few better sites for DIY party flair goodness than Style Me Pretty. A quick search brought me right to this tutorial, with free template. Maybe weddings aren't so bad afterall!
And of course, we had a great time!! Happy 4, E&O.
Every party starts with a theme. This year was the first time the kids chose for themselves: The Lorax. Perfectly non-conventional for me! I used a board on Pinterest (have you used it? omg it's my most favorite internet invention ever! go there!) to compile inspiration shots from around the web. I was amazed by what I accomplished with a limited budget. Using supplies I already had combined with a few purchases from the dollar store we were able to create a fantastical day!
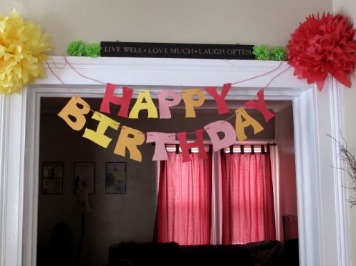
Handcut Birthday Banner from scrapbook paper, held together with crocheted cotton.


I handcrafted a dozen unique headbands. Headbands are a staple at our birthday parties. These had butterflies, birds, and feathers. They were probably my favorite part in creation and execution!

Of course, paper crowns for the kids. Which they typically wear for around five minutes, but I can't let go of it!

Hand-drawn Lorax overlooking the gifts. Heard a tip that the Dollar Tree sells $1 foam board. Good deal!

And finally the favors - packets of "Truffula Seeds" with the kids picture. You know how I feel about weddings, but there are few better sites for DIY party flair goodness than Style Me Pretty. A quick search brought me right to this tutorial, with free template. Maybe weddings aren't so bad afterall!
And of course, we had a great time!! Happy 4, E&O.
Wednesday, February 2, 2011
Valentine's Day Wreath

I was put in charge of making a Valentine's Day wreath for our office door. I
ended  up with this yo-yo wreath that used all supplies I had at home.
 up with this yo-yo wreath that used all supplies I had at home.
 For the base I used a sheet of bristol board. I cut a 10" circle. I made the base 1 1/4". I made a bunch of pink, red and heart printed yo-yos and glued them on with tacky glue. I then added buttons and trims that I had lying around. Easy, quick and a great way to use up some fabric scraps and odds and ends trims.
After finishing and hanging it up I wish I had made it heart shaped. But it was simple and easy and brightens up the door.
Side note: I treated myself to a few skeins of Debbie Stoller's Full O' Sheep yarn and it is lovely. It's great to knit with and is working up really soft. And the colors are fab.
Subscribe to:
Posts (Atom)